
 https://www.cad-vision.com.sg/wp-content/uploads/2023/05/solidworks-rx-problem-capture.png
1080
1080
regional marketing
https://www.cad-vision.com.sg/wp-content/uploads/2023/05/CVS-logo-tested-20-300x44.png
regional marketing2023-05-04 03:14:322023-05-04 03:14:32SOLIDWORKS Rx Problem Capture: A How-To Guide
https://www.cad-vision.com.sg/wp-content/uploads/2023/05/solidworks-rx-problem-capture.png
1080
1080
regional marketing
https://www.cad-vision.com.sg/wp-content/uploads/2023/05/CVS-logo-tested-20-300x44.png
regional marketing2023-05-04 03:14:322023-05-04 03:14:32SOLIDWORKS Rx Problem Capture: A How-To Guide
SOLIDWORKS Rx is a problem capture tool that can help you capture critical information of any issue faced in SOLIDWORKS, all while speeding up the troubleshooting process to prevent dragging your project timeline.
Have you ever experienced unexpected issues with your SOLIDWORKS application? Instances like your program crashing or something performing out of the usual?
If so, you’ve probably tried to contact your local SOLIDWORKS technical support and went back and forth with each other just because of collecting information.
Some of which can be done prior to contacting your local support. This can be achieved through problem capturing, which is a feature available in SOLIDWORKS Rx.
This guide will show you how to properly utilize this feature in SOLIDWORKS Rx to reduce needless exchanges between you and your local support.
What is Problem Capture?
Problem Capture is one of the built-in capabilities of SOLIDWORKS Rx where you can:
- Record a video of the problematic steps that are causing glitches or crashes.
- Log performance profiling data including disk and CPU activity from running processes.
- Write a description of the problem faced.
- Package your SOLIDWORKS files.
All these are then compiled into a ZIP folder that you can send directly to your local tech support to speed up the troubleshooting process.
Now that you understand what it is and what it does, let’s jump straight into the “how-to” part.
Launching Your SOLIDWORKS Rx
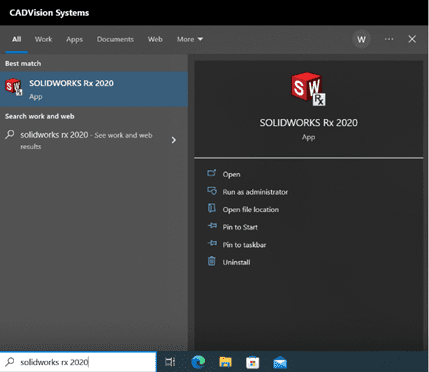
If you are using SOLIDWORKS Desktop, the quickest way to open the app is to just type “SOLIDWORKS Rx 20XX” in the Windows search bar based on the SOLIDWORKS version you currently own.
Or you can follow the usual file path: Start > All Programs > SOLIDWORKS 20xx > SOLIDWORKS Tools > SOLIDWORKS Rx 20xx.
For users who are using SOLIDWORKS Connected (3DEXPERIENCE SOLIDWORKS), you will have to access SOLIDWORKS Rx through the SOLIDWORKS application instead.
To do this, open the SOLIDWORKS app and click on the question mark icon located at the top right of your interface, then select SOLIDWORKS Rx shown in the dropdown bar.
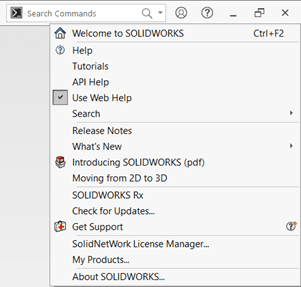
If it doesn’t show up in the dropdown list, the alternative is to directly search for it using the command search bar.

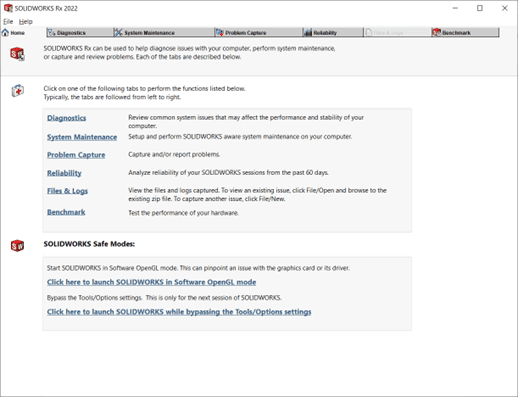
This will open up the SOLIDWORKS Rx dialog which looks like this.

Increase collaboration, improve execution, and accelerate innovation on a single cloud-based platform today.
Problem Capture with SOLIDWORKS Rx
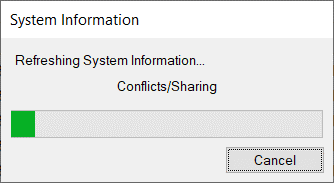
Click on the “Problem Capture” tab and the “System Information” dialog will pop up. Do not cancel it as the tool is gathering system information and packaging it automatically for you.
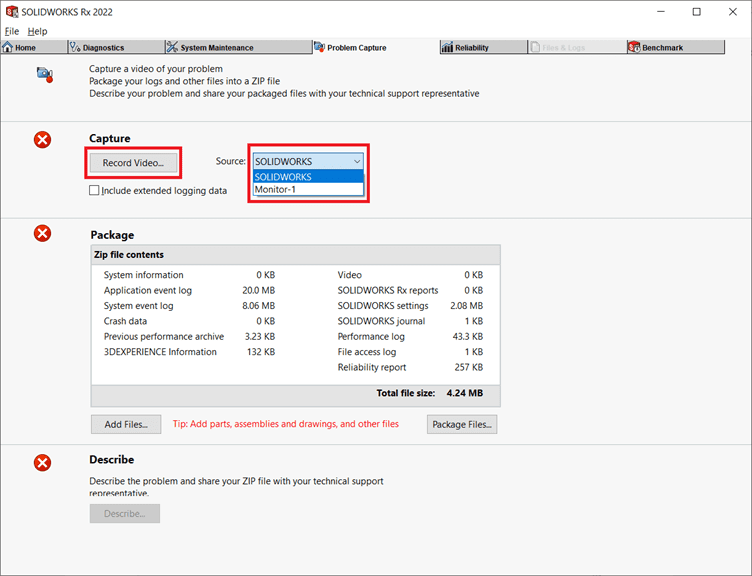
Once it is completed, you will see three different sections in the tab which are Capture, Package, and Describe.
CAPTURING THE PROBLEM
Before you begin to capture the problem, you must specify which source it is from.
This is important as it can be issues coming from other applications instead. For example, SOLIDWORKS Electrical, SOLIDWORKS Composer, etc.
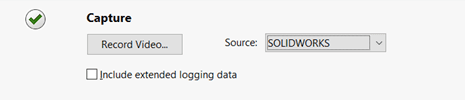
Here we’ll be selecting SOLIDWORKS as our option. Proceed to click on “Record Video” to start capturing.

If you already have a session of SOLIDWORKS running in the background, you will see the pop-up dialog as shown below.
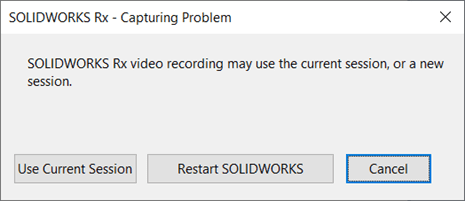
Select “Use Current Session” to capture issues that you cannot replicate at will.
If it is an issue that happens every single time, you may select the “Restart SOLIDWORKS Now” option.
*Disclaimer: If you choose not to restart SOLIDWORKS. All the files you have previously worked on in the same session will be included in the gathering file process.
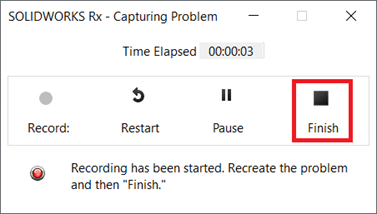
Either option will lead you to the following dialog.
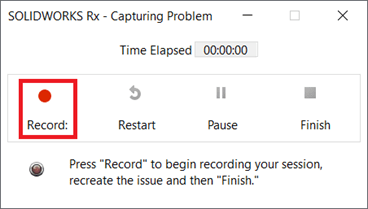
Before you click on the “Record” button, move the dialog away to the side so that it doesn’t obstruct the screen and the issue can be cleanly captured.
Click the “Finish” button when you’re done recording the issue.
A tick will show up beside the section, indicating that it is completed before moving on to the next step.
PACKAGING FILES
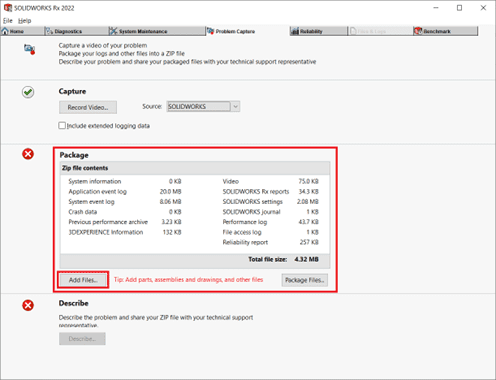
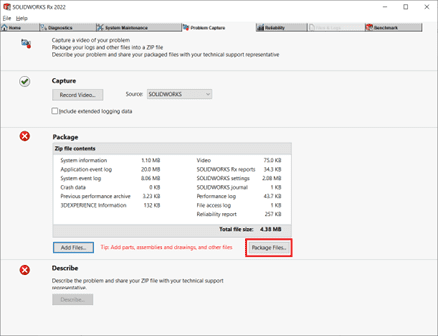
The package section (as the name suggests) is where you package your files into zip format.
Here, you will see a summary of all the information that will be included in the final ZIP file.
Click on “Add Files” to add any additional files that you would like to be included.
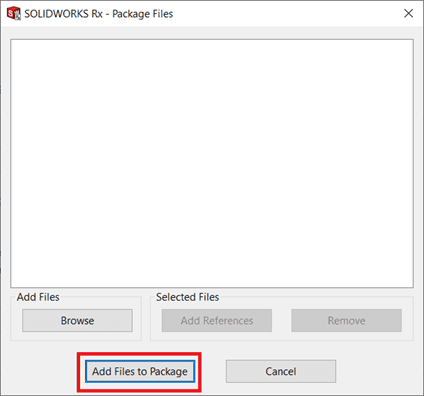
The Package Files window will pop up for you to view the files to be attached where you may browse further and include more files or remove unwanted ones as you see fit.
The “Add References” button also allows you to add any reference files such as children and parent parts, drawings, or assemblies.
Once you have verified the files to be added, click on “Add Files to Package”.
Click on the “Package Files” button to proceed.
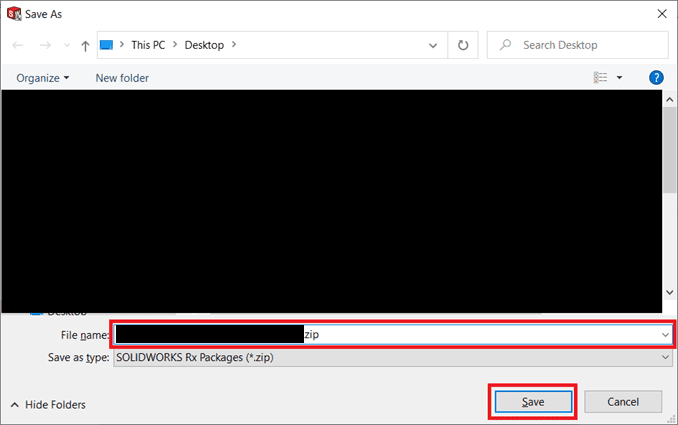
This will lead you to the “Save As” dialog. The resulting ZIP will be named as your serial number so just leave the file name as it is and click “Save”.
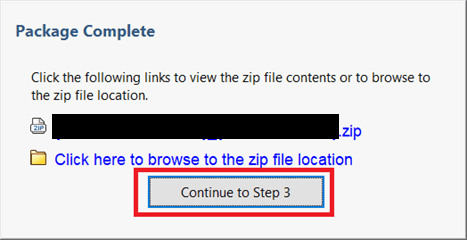
Once you are finished, the “Package Complete” dialog will appear. Proceed to Click on “Continue to Step 3” after confirming all the package content.
DESCRIBING THE PROBLEM
The describe section is where you can give additional details regarding the issue you’re facing. This option is available only after you’ve finished packaging the files. There, you will have access to the “Describe” button.

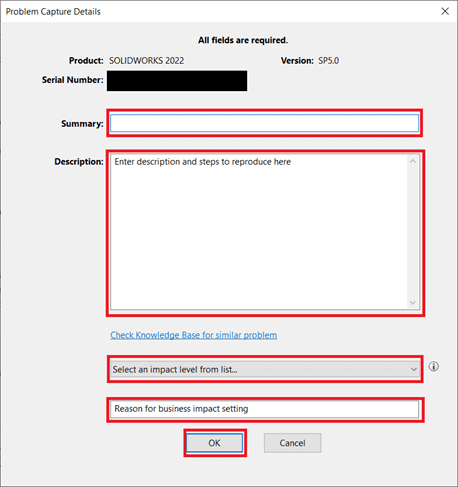
Afterward, the “Program Capture Details” window will appear. This is where you can talk about your issue in-depth to better describe the issue faced.
To assist in this, we’ve prepared a guideline for filling in the details below for your reference.
Click “OK” once all fields are completed.
Finally, the “Problem Capture Complete” dialog will appear, indicating that you have finished capturing the problem.
Here, you may click on various options that allow you to open the file, view file location or start a new problem capture.
Else, click “Exit SOLIDWORKS Rx” and end the session.
*Note: The default location for all SOLIDWORKS Rx ZIP files is located under the file path “C:\Users\’USERNAME’\Documents\SW Log Files\”
PROBLEM SEVERITY GUIDELINES
Summary: This is where you provide a short statement summarizing the whole problem so that others can easily understand the general overview of the issue you are facing.
Description: This is an in-depth version of your problem with more details. We recommend you write it descriptively and include details such as what actions you have taken to troubleshoot the issue or any changes you have recently made on your system, etc.
Impact Level: This determines the severity and urgency of the issue. Please refrain from selecting a higher impact level just to get the issue resolved faster as it may extend the resolution time if the impact is not justified properly.
- Critical: You are unable to operate the software and your work has come to a halt, severely impacting the business.
- High: Major feature(s) are inoperable, you can still continue your work, but business is significantly impacted.
- Medium: The software function is inoperable or not working as it should, you are unable to achieve the desired results and business is moderately impacted.
- Low: No loss in functionality, you are facing only minor problems such as documentation errors with little to no business impact.
- Question: You are asking general questions that have no business impact.
Reason for Business Impact: Here is where you justify why you’ve selected the chosen impact level. This helps with escalating the issue higher for quicker resolution when the business impact is justified.
Hope you found this guide helpful and don’t forget to subscribe to our newsletter to receive the latest information, trends, and guides, all surrounding SOLIDWORKS and the engineering industry.
Other Blog Posts:
https://www.cad-vision.com.sg/wp-content/uploads/2023/05/solidworks-rx-problem-capture.png
1080
1080
regional marketing
https://www.cad-vision.com.sg/wp-content/uploads/2023/05/CVS-logo-tested-20-300x44.png
regional marketing2023-05-04 03:14:322023-05-04 03:14:32SOLIDWORKS Rx Problem Capture: A How-To Guide https://www.cad-vision.com.sg/wp-content/uploads/2023/04/solidworks-drawing-template.png
1080
1080
regional marketing
https://www.cad-vision.com.sg/wp-content/uploads/2023/05/CVS-logo-tested-20-300x44.png
regional marketing2023-04-26 03:39:082023-04-26 03:41:58SOLIDWORKS Drawing Template: A Step-by-Step Guide
https://www.cad-vision.com.sg/wp-content/uploads/2023/04/solidworks-drawing-template.png
1080
1080
regional marketing
https://www.cad-vision.com.sg/wp-content/uploads/2023/05/CVS-logo-tested-20-300x44.png
regional marketing2023-04-26 03:39:082023-04-26 03:41:58SOLIDWORKS Drawing Template: A Step-by-Step Guide